
How to Add a Gallery Description in FooGallery
FooGallery is a very easy to use and feature rich gallery plugin for WordPress. It is especially useful if you want to group your galleries into albums, as this comes as standard with FooGallery, whereas it is a premium feature for many other gallery plugins. Being a user of NextGen Gallery in the past, and finding it overly complicated to use and customise, it was quite refreshing to find that FooGallery is very straight forward to use. As the documentation also claims it to be developer friendly and very extendable with over 80 hooks and actions, it would be interesting to find out how true this claim is.
As I was building a website for a client that needed a gallery plugin, I tried a few different plugins to find one that ticked as many boxes and possible and settled with FooGallery. The only thing that was missing was a gallery description for each gallery, my client needed this to enhance the on-page SEO and so it was time to find out how easy it would be to customise a template.
These are the steps I followed to add a gallery description to a FooGallery gallery, hopefully this tutorial will help the other people out there with the same question.
1 – Setting up a custom field for the description
Firstly you need to add a custom field to the edit gallery page specifically for the gallery description. That is, another field you can fill in on the edit screen to add a description. Some people suggested altering the custom post type to turn on the content editor, but I decided to use a custom field as I already had Advanced Custom Fields plugin installed.
If you’ve never used ACF it is very easy to use and you can add a field to almost any edit page in the WordPress dashboard. To continue with this tutorial you will need to install ACF on your WordPress website.
Once you have installed the plugin, go to ‘Custom Fields’ in the side menu and then choose to add a new field group. This is a collection of fields that are grouped together. In this case we will only be adding one field, for the gallery description.
Choose a name for your new group, for example I used ‘Gallery Information’, then click the blue button to add a new field.
All you need to fill in for the new field is the ‘Label’, ‘Field Name’, ‘Field Type’ which I set to Text Area as I expected that several sentences would be added for the description, and I added some ‘Field Instructions’ that would be seen by the client to explain what they needed to do. The screenshot below shows how I filled these fields in.

The other fields are not important in this case so you can click the ‘close field’ button at the bottom of the field, and move on to the next step.
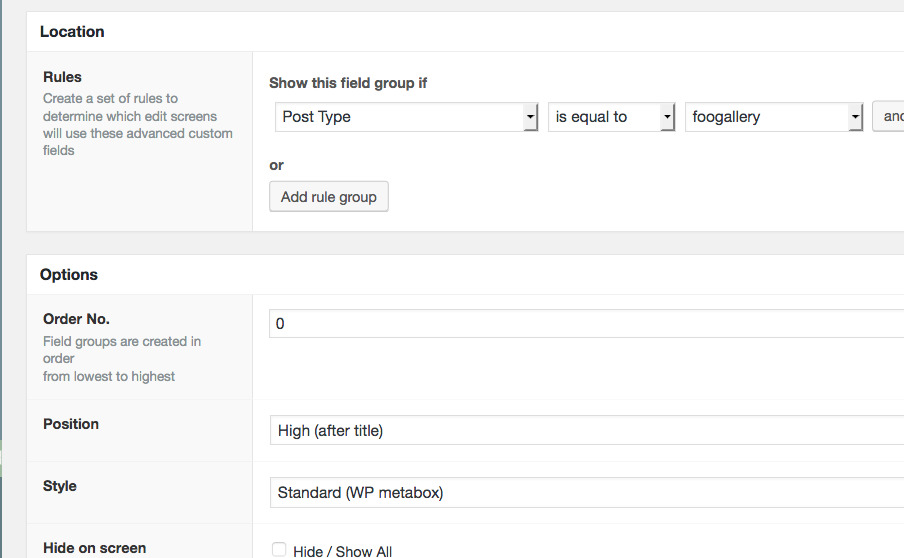
In the ‘Location’ panel you set rules which dictate where this new custom field will appear. We want it to show on the edit gallery page. I have already checked the name of the custom post type for FooGallery, which is quite aptly named foogallery, so in order to make the gallery description show on the ‘Edit Gallery’ page, we need to make it appear on all ‘foogallery’ custom post type pages.
Under the heading that says ‘Show this field group if’, set the first drop down to ‘Post Type’. set the second drop down to ‘is equal to’ and the third field to ‘foogallery’. This means that ACF will check that the post type is foogallery, and if it is, it will show the Gallery Description field.
Finally I set the position that I wanted the gallery description to show on the edit page, to ‘High (after title)’ so that it appeared at the top of the page before the panel to choose the images. (See the screenshot below.) You can now click the ‘Publish’ button, and visit an edit gallery page to make sure the field appears.
2 – Adjusting the Gallery Template
There’s more! Now that the gallery description field is set up and working, the field also has to be added to the template that FooGallery uses in order to display it on the website. This will need a little bit of PHP coding to get it working, and knowledge of your WordPress theme or child theme with access via FTP.
In your WordPress Theme or Child Theme, create a new folder and call it ‘foogallery’.
Next, find the default FooGallery template which is used for the responsive layout and copy it to the new folder in your theme. The FooGallery template is called ‘gallery-default.php’ and can be found by going to the foogallery folder in the WordPress plugins folder, then navigating to extensions/default-templates/default/gallery-default.php. Copy this file to the foogallery folder in your theme.
Open the ‘gallery-default.php’ file in an HTML or text editor.
Towards the bottom of this file you will see some code between two <div> </div> tags. This is the code that displays the gallery. To add the description above the gallery images, after the title, paste the following code starting the line above the first <div> tag. If you want the description to show below the gallery images, paste the code at the bottom of the file below all the other code.
You then need to save this file and upload the new foogallery folder to the WordPress Theme or Child Theme directory on the server. Once this is done and you’ve added a gallery description for your gallery in the WordPress admin, you should now see it on the website.


You May Also Like